Page 2 of 5
Posted: Thu Jul 19, 2007 6:48 am
by hairymick
Holy Smoke MK,
you sure are putting some thought and work into this one!


Well done mate. Your boat is looking great.
Posted: Thu Jul 19, 2007 7:35 am
by jem
Wow!
I wouldn't even know where to begin drawing up instructions how to do those recessed areas.
Obvisouly it can be done but that takes some craftsmenship and patience.
Posted: Thu Jul 19, 2007 8:01 am
by Mullet_Key
No skill, just a bunch of 90 degree edge-to-edge joints and gap filling epoxy. Patience, yes.
Posted: Thu Jul 19, 2007 4:14 pm
by dangermouse01
Mullet_Key wrote:No skill, just a bunch of 90 degree edge-to-edge joints and gap filling epoxy. Patience, yes.
MK;
Your selling yourself kinda short there. I would say at least a little skill involved with those recesses, along with a helping of imagination and patience.
Looking good.
DM
Summer Progress
Posted: Mon Aug 13, 2007 8:40 pm
by Mullet_Key
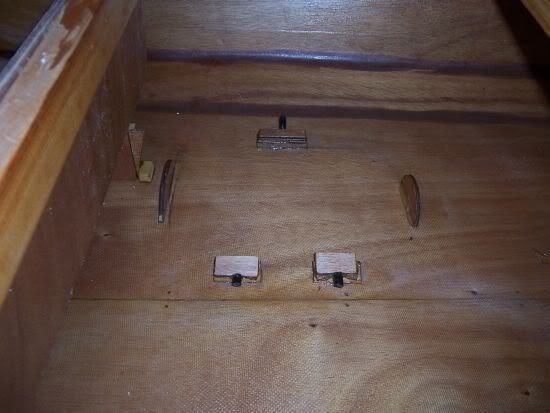
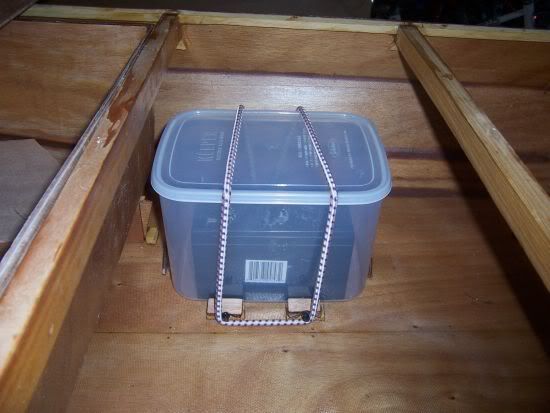
I'd like to see the bay and beach shoreline bottom transitions from a fish finder... which means installing something to contain a battery and mounting a fish finder transducer to "look" outside the wooden hull. I found a good sturdy plastic box with a sealing lid, just big enough for a 12-V deer feeder battery. I need to be able to remove the lid and take the battery out when not in use or transport. So I "nested the battery behind the cockpit held down with a bungee loop accessible from a large hatch at the mid deck. The black hooks are nylon pad eyes cut in half and glued at an angle to secure the bungee and make for easy removal.
Bungee Stations to Hold Down the Box
 Battery Box in Place
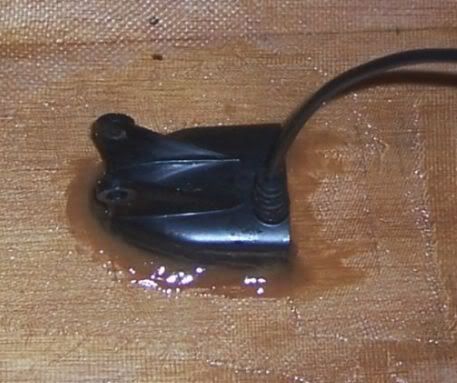
Fish Finder Transducer Installation
Posted: Mon Aug 13, 2007 8:44 pm
by Mullet_Key
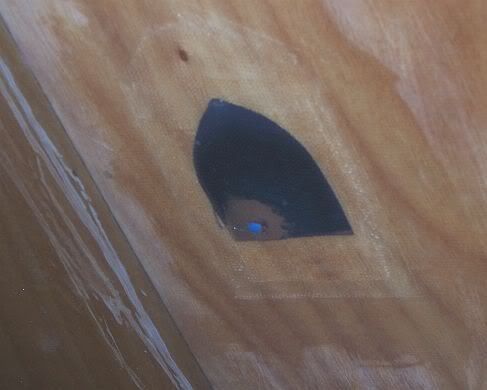
I cut hole in the hull to flush mount the transducer. I laid 2 layers of 3.25 oz glass on the underside using opposing weave direction, scuffed the transducer and sank it into some epoxy. I still need to provide some additional vertical support inside the hull. The blue dot on the underside shot is blue masking tape over the thermocouple. The ring around the blue dot is some thickened epoxy I used to make a little dam.
Inside the Hull
 What the fish see
 I
I
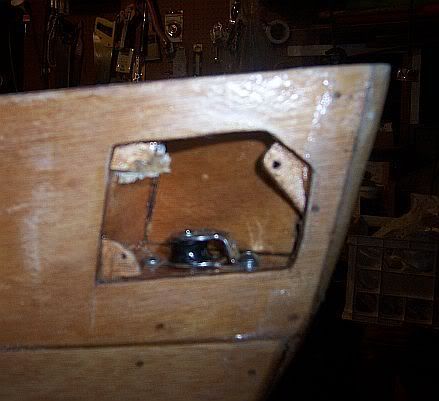
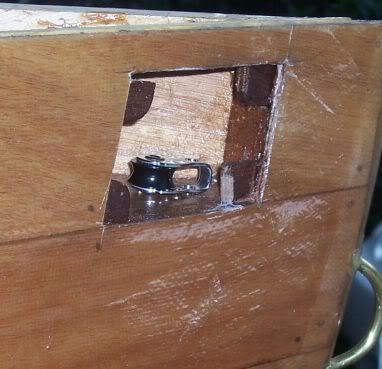
Anchor Trolly Rigging
Posted: Mon Aug 13, 2007 8:57 pm
by Mullet_Key
It's so windy here on the TX coast that I have to anchor the boat over fishing holes. The safest position tie off the anchor line is from the bow or the stern, so I borrowed some ideas from the locals and fashioned an internal anchor trolley that will allow me to place an anchor line on either side of the boat, and slide the anchor line back and forth like a clothes line. I still need to dress up the sheave boxes on both ends and route out small windows on each side for the trolley. The anchor trolley boxes are sealed to protect the inside from water intrusion.
The S/S sheaves are sailing hardware from West Marine. It'll look cleaned up when finished.
I've installed towing eyes on both ends using brazing rod stock. You can see one on the stern. I did this on my Arctic Tern. My grab loops are removable.
My components are mostly ready for the final installation. I expect most everything glued in before the end of the week. I still need to finish my center console for the fish finder display, rod holder, and GPS.
Bow Anchor Trolley Sheave / Box
 Stern Anchor Trolley Sheave
Posted: Wed Aug 15, 2007 5:29 am
by dangermouse01
M_K;
Very interesting stuff you are doing with that anchor trolley, cant wait to see some more pictures as it gets farther along.
Looks good.
DM
Posted: Thu Sep 13, 2007 10:39 am
by Mullet_Key
Rear deck, tankwell, tankwell side panels, cockpit, console, and foredeck have all been attached. Yes, photo's would help. Before I glue on the cockpit side panels, I'm toying with the idea of installing "built in" grab handles on the sides like one of the new plastic SOT's. Constructing the "boxes" to protect the inner hull from the Gulf of Mexico is a challenge. I don't want to spend much more time on this than I have to. I'd rather be fishing.
I and another guy carried one the other day and it felt like a more solid hook up than the commercial webbing & rubber grab handles screwed to the hull with two screws. One pulled out from my Tarpon 140. Photos by the weekend - MK
Grab Handles
Posted: Thu Sep 13, 2007 10:39 am
by Mullet_Key
Rear deck, tankwell, tankwell side panels, cockpit, console, and foredeck have all been attached. Yes, photo's would help. Before I glue on the cockpit side panels, I'm toying with the idea of installing "built in" grab handles on the sides like one of the new plastic SOT's. Constructing the "boxes" to protect the inner hull from the Gulf of Mexico is a challenge. I don't want to spend much more time on this than I have to. I'd rather be fishing.
I and another guy carried one the other day and it felt like a more solid hook up than the commercial webbing & rubber grab handles screwed to the hull with two screws. One pulled out from my Tarpon 140. Photos by the weekend - MK