I missed the broken rib part. You tell Robin she couldn't paddle your boats or something?
Hairie's Okwata 15 X 26 LC
-
jem
- Site Admin
- Posts: 4915
- Joined: Fri Jun 18, 2004 8:14 pm
- Type of boat I like: Wooden
- Location: Greensboro, NC
- Contact:
Re: Hairie's Okwata 15 X 26 LC
Whoa! 
I missed the broken rib part. You tell Robin she couldn't paddle your boats or something?
I missed the broken rib part. You tell Robin she couldn't paddle your boats or something?
-Matt. Designer.
-
hairymick
- Design Reviewer
- Posts: 1965
- Joined: Wed Jan 04, 2006 8:54 am
- Type of boat I like: <-- Please read instructions to the left and delete this text. Then, tell us what type boat you like! :-)
- Location: Queensland, Australia
- Contact:
Re: Hairie's Okwata 15 X 26 LC
Nah,
had a little fight at my work. getting too old for that chit.
gonna have to retire,I think.
Miz Robin would have hurt me much worse than that.
had a little fight at my work.
gonna have to retire,I think.
Miz Robin would have hurt me much worse than that.
Regards,
Mick
JEMWATERCRAFT Swampgirl; Wadefish;Touring Pirogue;South Wind; P5 ;
Laker X 2, Sasquatch 16.5 T-V 15 Okwata 15:
Cobia 15 (under construction)
Mick
JEMWATERCRAFT Swampgirl; Wadefish;Touring Pirogue;South Wind; P5 ;
Laker X 2, Sasquatch 16.5 T-V 15 Okwata 15:
Cobia 15 (under construction)
-
Harold Ray
- Posts: 4
- Joined: Sun Dec 07, 2008 12:59 am
Re: Hairie's Okwata 15 X 26 LC
I just got into the site and in scanning through several of the threads, I find myself really enjoying your's, Mick. I know zero about building kayaks or anything else, but I think I'm going to try one of the simpler forms after the first of the year.
Thanks for all of the pictures and info, Mick. It helps a pure novice at least get an idea of what is going on!
Ray
Thanks for all of the pictures and info, Mick. It helps a pure novice at least get an idea of what is going on!
Ray
-
Harold Ray
- Posts: 4
- Joined: Sun Dec 07, 2008 12:59 am
Re: Hairie's Okwata 15 X 26 LC
Okay, now I've got a couple of Mick's images off photobucket and am ready to ask some questions!
Mick, in the image above and your discussion on this, are the screws running through the panels and into the supporting table beneath the panels to hold everything firmly in place. Also, I believe you said you lay the opposite side's panels on top and glue them at the same time to make sure both sides correspond correctly. The panels are only seperated by wax paper or something like that to prevent their (the opposite sides) gluing themselves together. Everything is screwed down to the supporting table you are working on. Is that correct?
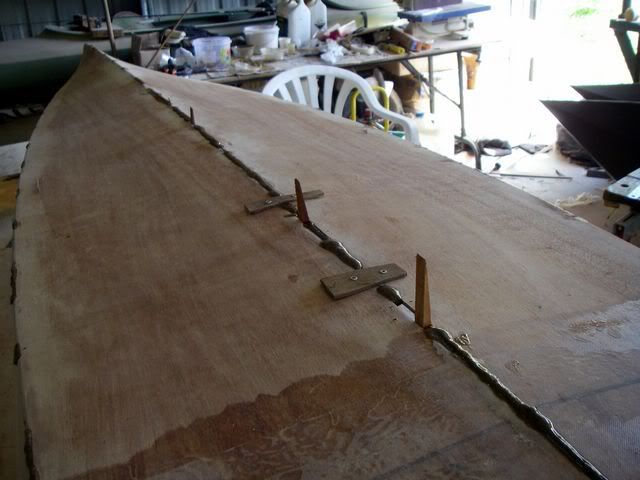
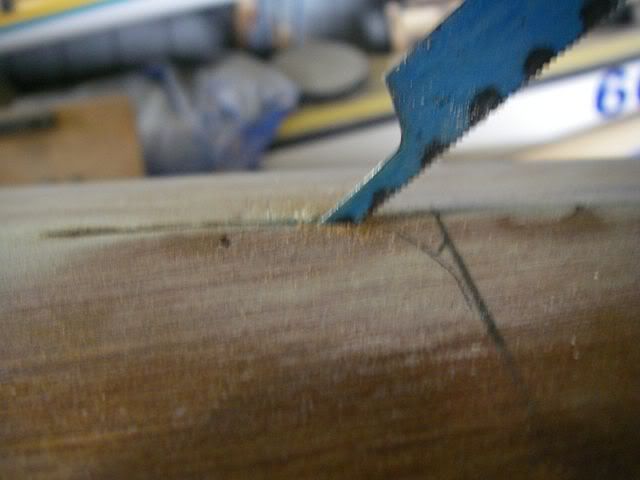
In this image, you mention tacks, filleting and wedges.
1. Are the tacks the sutures that hold the panels together, i.e. you've got all panels in the top and bottom of the boat sewn together with wire stitches until you align them and glue them together?
2. Is filleting the gluing together of the panels, or what? I didn't have a clue on this. It will take me some time to learn the terminology. Its completely foreign to me! Is there a dictionary of terms on this nautical site?
3. With all of the panels, you push and mold them into the form you want, the form shown on the blueprints. How are the wedges helping in that process, and are they sticking through the bottom of the kayak???? What are the wooden straps with screws; anything other than a method to hold both main top panels and the rest of the panels together so they won't move?
That's my questions for now, but I can guarantee all of you there will be more!!
Thanks, guys,
Ray
Mick, in the image above and your discussion on this, are the screws running through the panels and into the supporting table beneath the panels to hold everything firmly in place. Also, I believe you said you lay the opposite side's panels on top and glue them at the same time to make sure both sides correspond correctly. The panels are only seperated by wax paper or something like that to prevent their (the opposite sides) gluing themselves together. Everything is screwed down to the supporting table you are working on. Is that correct?
In this image, you mention tacks, filleting and wedges.
1. Are the tacks the sutures that hold the panels together, i.e. you've got all panels in the top and bottom of the boat sewn together with wire stitches until you align them and glue them together?
2. Is filleting the gluing together of the panels, or what? I didn't have a clue on this. It will take me some time to learn the terminology. Its completely foreign to me! Is there a dictionary of terms on this nautical site?
3. With all of the panels, you push and mold them into the form you want, the form shown on the blueprints. How are the wedges helping in that process, and are they sticking through the bottom of the kayak???? What are the wooden straps with screws; anything other than a method to hold both main top panels and the rest of the panels together so they won't move?
That's my questions for now, but I can guarantee all of you there will be more!!
Thanks, guys,
Ray
-
olsnappa
- Posts: 300
- Joined: Mon Dec 17, 2007 7:03 am
- Type of boat I like: <-- Please read instructions to the left and delete this text. Then, tell us what type boat you like! :-)
- Location: Melbourne, Australia
Re: Hairie's Okwata 15 X 26 LC
hairymick wrote:
had a little fight at my work.
Hope you feeling better soon.....she's coming along nicely.
You'd be the only one who wouldn't let a little thing like cracked ribs slow down a build......take it easy, mate.
John.
1 Cape Fear Sit In....a couple more planned
2 Laker 14's
1 Paddle board
"People who don't make mistakes don't make anything"
1 Cape Fear Sit In....a couple more planned
2 Laker 14's
1 Paddle board
"People who don't make mistakes don't make anything"
-
hairymick
- Design Reviewer
- Posts: 1965
- Joined: Wed Jan 04, 2006 8:54 am
- Type of boat I like: <-- Please read instructions to the left and delete this text. Then, tell us what type boat you like! :-)
- Location: Queensland, Australia
- Contact:
Re: Hairie's Okwata 15 X 26 LC
G'day Harold, and welcome aboard mate.  - and thanks for the kind words and the questions. I try to contruct my build threads sort of like a "how to" or how not to as the case may be in the hope that they might be of some little use to budding builders and really appreciate the fact that they might actually help somebody.
I am no master boat builder but my methods are pretty simple and they seem to work OK for me. Will try to answer your questions as best I can.
All the stitches do is hold the panels in place till the tacks set up.
http://jemwatercraft.com/forum/viewforum.php?f=7
I have modified my methods a little to better suit my whims but can thoroughly recommend the methods as stated by Matt. They work every time and are probably stronger than mine.
Mate as far as I know, there is no dictionary and the meaning ofmost of the terms we use here will come soon enough. I had to learn to understand American and re-learn feet and inches when I started. Now, I just don't bother. I just measure everything in metric. (much easier) The trick to it is to throw your standard tape measure away, get a good metric only tape and measure from the specs in the drawings. You will be surprised how quickly you can pick it up. (probably take about 5 minutes)
The panels holding the wedges are the bottom panels, and the wedges are placed in the centre, longditudinal seam. When these panels are marked out, they are allmost, but not quiet straight along most of the length. Unfortunately, my eyes are not as good as they could be, so my trimming of the panels is not quite as accurate as it should be.
When the panels are stitched together, and the hull inverted, I ALLWAYS run a very critical eyeball along every seam in the boat, looking for any wobbles in the symmetry of the thing. Each and every panel joint should have a smooth, even curve along its length. Where the panels have had a little too much trimmed off them, the tie wires pull them together too tight and this causes a dip in the curve of the seam. The only way to overcome this, it to loosen the tie and wedge the panels apart a little to achieve the curve required. The gap can be easily filled with epoxy/woodflour and it will not affect the integrity of the hull.
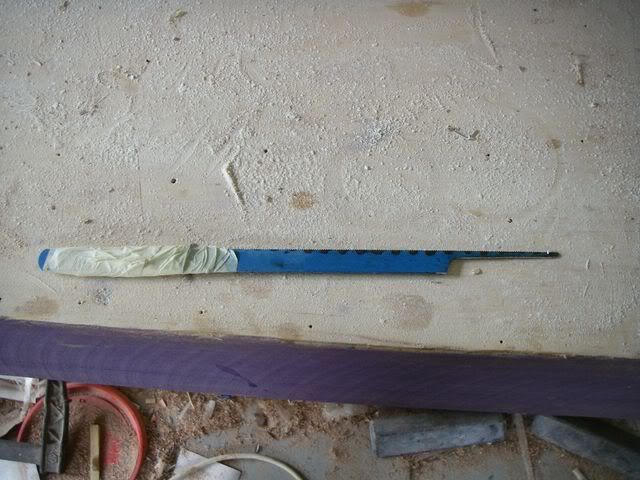
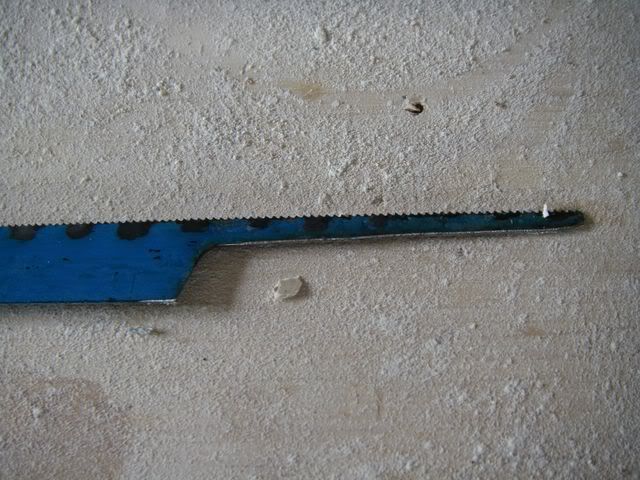
Likewise, sometimes, not enough has been trimmed off the panels and this will cause a high spot in the seam. the ties need to be cut in that area and each panel needs to be gently sanded so that the high spot dissappears. Often I have stitched and tacked the bottom seam several times and had to cut some of the tacks and re-work them to get the lines that I liked. I had three attempts on the bottom seam of this boat. (Don't use a jig or sabre saw for this. The panels will bind on the blade and break) I use a hacksaw blade and hold it so that it cuts on the up stroke.
G'day Snapps,
Thanks mate LOL
Too old and waaaay to mean to let that interfere too much with my all consuming passion for building these things.
Got a little done today before the Honey Do stuff over-ruled me.
While the decks were stitched to the hull and stable, i marked and cut the holes for my hatches.
I use a modified hack saw blade for cutting the real tight curves.
Decks are off and started the prep work for the interior fillets. the masking tape ensures nice clean lines along the fillet edges. Harold, I will post a step by step thingy on this for you when I get to it.
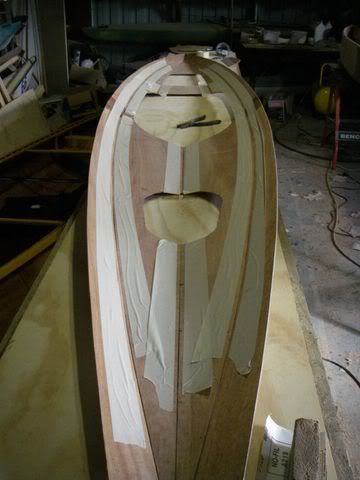
Temp frames/bulkheads are out of the hull, and allmost ready for epocy and fibreglass on the inside.

I am no master boat builder but my methods are pretty simple and they seem to work OK for me. Will try to answer your questions as best I can.
The stitches are the wire ties I use to temporarily hold my panels together while glueing. The Tacks are a mix of epoxy resin and woodflour (sawdust) that I put between the stitches as the start of the glueing process. (The whole process is well explained in the tips and tricks section of this forum.1. Are the tacks the sutures that hold the panels together, i.e. you've got all panels in the top and bottom of the boat sewn together with wire stitches until you align them and glue them together?
All the stitches do is hold the panels in place till the tacks set up.
http://jemwatercraft.com/forum/viewforum.php?f=7
I have modified my methods a little to better suit my whims but can thoroughly recommend the methods as stated by Matt. They work every time and are probably stronger than mine.
In the truest sense of the word, as I understand it, "Filleting" means the epoxy and woodflour mix used to re-inforce the glued panels on the inside of the hull. It also creates a concave and rounded surface over which the fibre-glass is more properly applied. Out of lazyness, I call the application of wood-flour anywhere filleting.2. Is filleting the gluing together of the panels, or what? I didn't have a clue on this. It will take me some time to learn the terminology. Its completely foreign to me! Is there a dictionary of terms on this nautical site?
Mate as far as I know, there is no dictionary and the meaning ofmost of the terms we use here will come soon enough. I had to learn to understand American
Mate, that is a very perceptive question.3. With all of the panels, you push and mold them into the form you want, the form shown on the blueprints. How are the wedges helping in that process, and are they sticking through the bottom of the kayak???? What are the wooden straps with screws; anything other than a method to hold both main top panels and the rest of the panels together so they won't move?
The panels holding the wedges are the bottom panels, and the wedges are placed in the centre, longditudinal seam. When these panels are marked out, they are allmost, but not quiet straight along most of the length. Unfortunately, my eyes are not as good as they could be, so my trimming of the panels is not quite as accurate as it should be.
When the panels are stitched together, and the hull inverted, I ALLWAYS run a very critical eyeball along every seam in the boat, looking for any wobbles in the symmetry of the thing. Each and every panel joint should have a smooth, even curve along its length. Where the panels have had a little too much trimmed off them, the tie wires pull them together too tight and this causes a dip in the curve of the seam. The only way to overcome this, it to loosen the tie and wedge the panels apart a little to achieve the curve required. The gap can be easily filled with epoxy/woodflour and it will not affect the integrity of the hull.
Likewise, sometimes, not enough has been trimmed off the panels and this will cause a high spot in the seam. the ties need to be cut in that area and each panel needs to be gently sanded so that the high spot dissappears. Often I have stitched and tacked the bottom seam several times and had to cut some of the tacks and re-work them to get the lines that I liked. I had three attempts on the bottom seam of this boat. (Don't use a jig or sabre saw for this. The panels will bind on the blade and break)
Mate, Ask away!! this is the whole purpose of this forum. Many of the guys here are way better builders than I am and I have learn't just about every thing I know about this caper from them.That's my questions for now, but I can guarantee all of you there will be more!!
G'day Snapps,
Thanks mate LOL
Too old and waaaay to mean to let that interfere too much with my all consuming passion for building these things.
Got a little done today before the Honey Do stuff over-ruled me.
While the decks were stitched to the hull and stable, i marked and cut the holes for my hatches.
I use a modified hack saw blade for cutting the real tight curves.
Decks are off and started the prep work for the interior fillets. the masking tape ensures nice clean lines along the fillet edges. Harold, I will post a step by step thingy on this for you when I get to it.
Temp frames/bulkheads are out of the hull, and allmost ready for epocy and fibreglass on the inside.
Regards,
Mick
JEMWATERCRAFT Swampgirl; Wadefish;Touring Pirogue;South Wind; P5 ;
Laker X 2, Sasquatch 16.5 T-V 15 Okwata 15:
Cobia 15 (under construction)
Mick
JEMWATERCRAFT Swampgirl; Wadefish;Touring Pirogue;South Wind; P5 ;
Laker X 2, Sasquatch 16.5 T-V 15 Okwata 15:
Cobia 15 (under construction)
-
Harold Ray
- Posts: 4
- Joined: Sun Dec 07, 2008 12:59 am
Re: Hairie's Okwata 15 X 26 LC
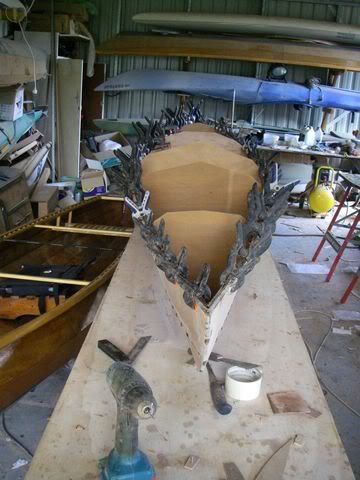
After looking at the image above, I was wondering how many clamps I need to buy to build a boat? I didn't count these, Mick, but there's a bunch. I see the reason for them, just hadn't really thought about the need to hold everything to gether like you do. Of course, once you make the investment you won't have to buy again for a long time, if ever.
Ray
-
hairymick
- Design Reviewer
- Posts: 1965
- Joined: Wed Jan 04, 2006 8:54 am
- Type of boat I like: <-- Please read instructions to the left and delete this text. Then, tell us what type boat you like! :-)
- Location: Queensland, Australia
- Contact:
Re: Hairie's Okwata 15 X 26 LC
Mate,
You can NEVER have too many clamps. LOL
Supercheap have bags of 20 in varying sizes for about 12 bucks - I think.
Others here have made clamps out of PVC pipe but I don't like these clamps much. The Chinese import stores also stock them at a good price. A few smallish "C" clamps of around 70 to 100mm are also a good investment. Just grab a few each time you go to one of these stores. You will be surprised how quickly their numbers grow. Or, if money is tight, when I get a chance, I will post a thread on how to make quick and easy clamps out of scraps of wood. About all they would cost is the price of a couple of screws and some time, but they are not quite as convenient to use as the spring clamps.
Regards,
Mick
JEMWATERCRAFT Swampgirl; Wadefish;Touring Pirogue;South Wind; P5 ;
Laker X 2, Sasquatch 16.5 T-V 15 Okwata 15:
Cobia 15 (under construction)
Mick
JEMWATERCRAFT Swampgirl; Wadefish;Touring Pirogue;South Wind; P5 ;
Laker X 2, Sasquatch 16.5 T-V 15 Okwata 15:
Cobia 15 (under construction)
-
Harold Ray
- Posts: 4
- Joined: Sun Dec 07, 2008 12:59 am
Re: Hairie's Okwata 15 X 26 LC
I'll buy 'em, Mick.
Ray
Ray