dangermouse01 builds a Wadefish 2.0

Builder show and discuss their progress.
Craig Lewis
Posts: 18
Joined: Mon Jul 31, 2006 7:35 pm
Type of boat I like: <-- Please read instructions to the left and delete this text. Then, tell us what type boat you like! :-)
Location: San Jose, CA

Post by Craig Lewis »

Kayak Jack wrote:
Craig Lewis wrote:Jack, If your gonna raise the hatch, you may as well buy a large plastic container and strap it into the front well area.
Sounds like a 5 gallon plastic bucket with a Magna seal on it?
Jack,
5-gallon buckets are often used in the rear well on the plastic SOTs and I use one too about 50% of the time. Some mod them into live bait tanks with a 12v aerator pump/spray nozzle. Some hav even used them to create serious drag in the water when they catch a large thresher shark, I'm not kidding.
I was picturing modern tupperware container in my previous post.
R U pulling my leg again?
Craig
Kayak Jack
Design Reviewer
Posts: 1186
Joined: Sun Jun 20, 2004 8:03 pm
Type of boat I like: <-- Please read instructions to the left and delete this text. Then, tell us what type boat you like! :-)
Location: South-central Michigan

Post by Kayak Jack »

Not pulling your leg at all. The ubiquitous 5 gallon pail is an American commodity. Cheap and clumsy, they pinch our fingers, bang our legs, and carry the stuff.

Mine come from a budget (read cheap) laundry detergent that smells way too flowery in the bucket, and taints the bucket. I swap them out to guys with odorless buckets who don't care.
Kayak Jack
Doing what you like is FREEDOM
Liking what you do is HAPPINESS
I spent most of my money on whiskey and women - and I'm afraid I just wasted the rest.
dangermouse01
Posts: 200
Joined: Mon Jul 31, 2006 6:32 pm
Type of boat I like: <-- Please read instructions to the left and delete this text. Then, tell us what type boat you like! :-)
Location: Palm Bay, FL (east coast)

Post by dangermouse01 »

Craig Lewis wrote:Scottrunner's front hatch layout is what I was refering about, order another 8in or hopefully 10inch round will fit would be great. His location is very wise.
The construction instructions require a hatch of some sort in either the front cockpit wall (like Scottrunner's) or in the front deck (like Mick's).

DM
dangermouse01
Posts: 200
Joined: Mon Jul 31, 2006 6:32 pm
Type of boat I like: <-- Please read instructions to the left and delete this text. Then, tell us what type boat you like! :-)
Location: Palm Bay, FL (east coast)

Post by dangermouse01 »

Well, caught wind that Mick was starting the build of another boat.
So I figured I should get moving.
Goofed of yesterday (Sat) and went paddling, was gonna go paddling again today, but decided I should work on the WF 2.0 instead.
Got the tankwell all together and about 90% filleted.
After a dry fit of everything on the work table, I traced the outline of the TW floor and the took everything apart and then put down a strip of packing tape on the table over the outline so any epoxy that got thru would not bond to the table. Packing tape is your friend.:lol:
Squared up some pieces of pine on the jointer and put packing tape on the sides, clamped them to the table and used them outside of the tank well to locate, align and support the walls.
Image
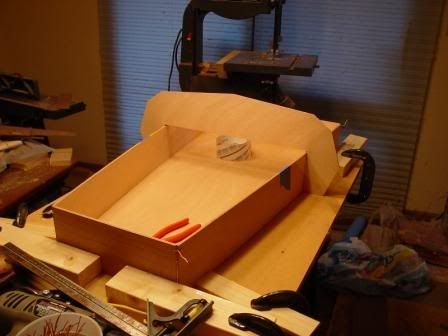
Had one support block at the back of my table, which I butted the forward TW wall against and then butted the TW floor against the TW wall. Then I butted the aft TW wall against the TW floor edge and held it in place with two pieces of pine. Then butted the TW sides to the floor and put a pine piece at the forward end to hold in place and a smaller piece at the aft to hold in place.
Used packing tape from inside the TW to the outside of the table to hold things at 90 degrees. You can just kinda see it just in front of the lateral frame support in the above picture.
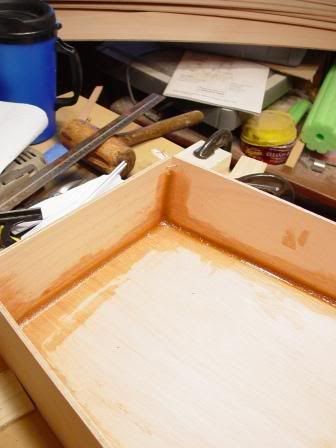
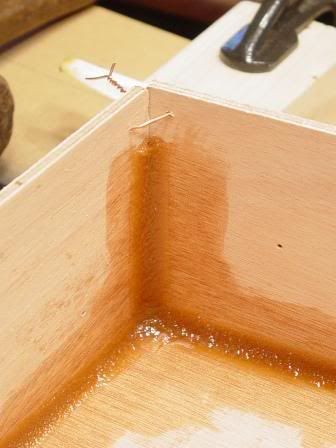
One stitch in each upper corner, to hold them in place and it was time to fillet.
Image
My favorite filleting tool.
Image
Once the fillets cure, snip the stitch and I will finish of the fillet.
Image
Gotta go and get back to work on the cockpit stitching, I hear the sound of tools revving up from the other side of the equator.

DM
...................................................
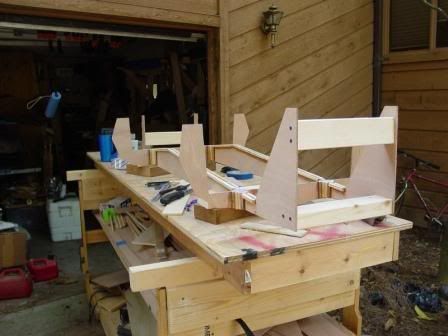
Sunday part two
Cockpit frame which was finished during the week. Cleats on the lateral frames are not installed yet, will happen farther down the road. Still havent decided on whether to add the semi-circle cut outs to the longitudinal frames yet.
Image
Cockpit aligned and stitched together on the cockpit frame and ready for tabbing.
Image
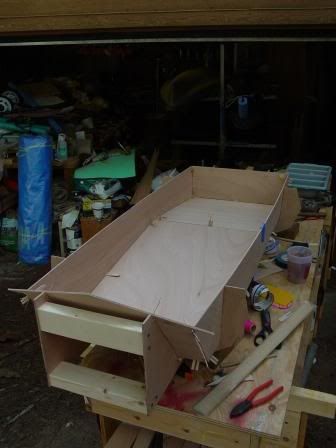
Rolled it back into the garage and did the tabbing.

DM
hairymick
Design Reviewer
Posts: 1965
Joined: Wed Jan 04, 2006 8:54 am
Type of boat I like: <-- Please read instructions to the left and delete this text. Then, tell us what type boat you like! :-)
Location: Queensland, Australia
Contact:

Post by hairymick »

Hey DM,

Impressive workmanship mate. Love your very detailed description of what you are doing and why. Bloody good on ya mate. :D
Regards,
Mick

JEMWATERCRAFT Swampgirl; Wadefish;Touring Pirogue;South Wind; P5 ;
Laker X 2, Sasquatch 16.5 T-V 15 Okwata 15:
Cobia 15 (under construction)
Kayak Jack
Design Reviewer
Posts: 1186
Joined: Sun Jun 20, 2004 8:03 pm
Type of boat I like: <-- Please read instructions to the left and delete this text. Then, tell us what type boat you like! :-)
Location: South-central Michigan

Post by Kayak Jack »

Those SOT's look like a complicated boat to build. Two boats in one. I'm thinking I'd best stick to the hollow-hull types.
Kayak Jack
Doing what you like is FREEDOM
Liking what you do is HAPPINESS
I spent most of my money on whiskey and women - and I'm afraid I just wasted the rest.
jem
Site Admin
Posts: 4915
Joined: Fri Jun 18, 2004 8:14 pm
Type of boat I like: Wooden
Location: Greensboro, NC
Contact:

Post by jem »

More like 1.5 boats but whose counting? :lol:

They do require more effort to build.
-Matt. Designer.
dangermouse01
Posts: 200
Joined: Mon Jul 31, 2006 6:32 pm
Type of boat I like: <-- Please read instructions to the left and delete this text. Then, tell us what type boat you like! :-)
Location: Palm Bay, FL (east coast)

Post by dangermouse01 »

Kayak Jack wrote:Those SOT's look like a complicated boat to build.
The first few times I read thru the instructions, I was thinking the exact same thing. But actually it is going together quite easily.

The cockpit frame looked the most daunting, but thats just because there is a lot of small pieces that give it the ridgedity. Even then it mostly lining up edges when epoxying parts together.
Measure twice, epoxy once :lol:

The hull construction is typical S&G.

Some of the construction details are pretty ingenious. 8)
And Matt is quick to answer any emails if any questions do come up.

Get to put the big table back together soon and start assembling the hull panels.

DM
Craig Lewis
Posts: 18
Joined: Mon Jul 31, 2006 7:35 pm
Type of boat I like: <-- Please read instructions to the left and delete this text. Then, tell us what type boat you like! :-)
Location: San Jose, CA

Post by Craig Lewis »

Two stitches vs my 15+ to make a TW?
I shouldn't follow this thread, it's painful!
Kayak Jack
Design Reviewer
Posts: 1186
Joined: Sun Jun 20, 2004 8:03 pm
Type of boat I like: <-- Please read instructions to the left and delete this text. Then, tell us what type boat you like! :-)
Location: South-central Michigan

Post by Kayak Jack »

dangermouse01 wrote:...Get to put the big table back together soon and start assembling the hull panels.
When I started building boats, I did it on the basement floor. Squatting and bending to build the second boat just killed my back, and I hated to go work on it. I'd tried plywood up on sawhorses made of 2 X 4's fastened at the ends with those metal clips. BUMMER! Kept falling apart.

Finally, I decided to spoil myself a bit. I went and got two pairs of the metal saw horses that fold and have a shelf in the middle. I took a piece of 3/8" ply and ripped it up the center, making two chunks 2' X 8'. These are my "bench halves".

Since 3/8" is a bit flimsy to work on, I screwed on some old wooden banister pieces I had. Each is about 5' long, and I put them on the centerline of each piece, long ways.

When I'm working with a whole piece of plywood, I attach the bench-halves side by side to re-establish a 4' X 8' bed. The bannister braces are on the bottom. I have two 1" X 2" slats bolted (with machine screws w/ countersunk heads, nuts, & washers) to the bottom to hold the bench halves together.

Once my panels are cut and need to be butt jointed into boat-length pieces, I rearrange the saw horses & bench. Now, I fasten bench halves end to end in a 2' X 16' bench. The fastening slats underneath move to new pairs of pre-drilled holes, and get tightened in.

This arrangement gives me the best of both worlds: long and narrow and short and wide - each configuration when I need it.

Right next to this baby, is a Black and Decker Shop Mate. This folding work-bench combination wood vice is a real helper. Normally, I have a piece of plywood clamped into it. I have a 2' X 4' piece of 3/8" with its front edge laying along the front edge of the Work-Mate.

I measured, and screwed on a short chunk of 2 X 4 onto the bottom of this add-on bench top. It has to be about a foot long to fit in between the two jack screws that work the bench top. So, I open the top jaws of the Work-Mate, lay on the the 2' X 4' plywood with the attached 2 X 4 on the bottom in between the open jaws, and screw the jaws shut. Now, I have a large work area for detail work & storing bottles of epoxy & such.
Kayak Jack
Doing what you like is FREEDOM
Liking what you do is HAPPINESS
I spent most of my money on whiskey and women - and I'm afraid I just wasted the rest.
Post Reply