Great summer/fall w/ 2 great yaks!
-
craiggamesh
- Posts: 465
- Joined: Mon Aug 04, 2008 12:01 am
- Type of boat I like: <-- Please read instructions to the left and delete this text. Then, tell us what type boat you like! :-)
- Location: Portland, Oregon
Re: Great summer/fall w/ 2 great yaks!
Thanks Scott. I looked at the videos for the HD camera on their website. Those base jumping videos are awesome. Now after seeing what it looks like to jump off a cliff, I no longer have to attempt it myself.  Its too bad they don't have an external microphone jack on the waterproof housing. It would make the whole process easier for you. By the way, how hard is it to synch up the sound with the video?
Regards,
Craig
------------------------------------------------------
If I had more clamps, I could build more boats.

Craig
------------------------------------------------------
If I had more clamps, I could build more boats.
-
scottrunnr
- Posts: 389
- Joined: Sun Apr 23, 2006 8:34 pm
- Type of boat I like: <-- Please read instructions to the left and delete this text. Then, tell us what type boat you like! :-)
- Location: Brookline, MA
Re: Great summer/fall w/ 2 great yaks!
Craig,
Mostly just trial and error to get it right as long as you have decent video editing software. Yes, an external jack for the camera would be ideal!
Mostly just trial and error to get it right as long as you have decent video editing software. Yes, an external jack for the camera would be ideal!
Re: Great summer/fall w/ 2 great yaks!
I've also got 2 yaks to build. Being a 1st time builder I got the Laker 14 that I'll make for my wife and then I'll build the Okwata for myself. I rolled the idea of putting an insulated storage chamber on both yaks, but you beat me to it. Can you show us how you did it?
Thanks, Phishtech
Thanks, Phishtech
Re: Great summer/fall w/ 2 great yaks!
Thanks, Matt, I really enjoy your forum and you have a very wide knowledge base of experienced boat builders here. I learn something new everytime I log on.
-
scottrunnr
- Posts: 389
- Joined: Sun Apr 23, 2006 8:34 pm
- Type of boat I like: <-- Please read instructions to the left and delete this text. Then, tell us what type boat you like! :-)
- Location: Brookline, MA
Re: Great summer/fall w/ 2 great yaks!
Phishtech,
I hope this helps explain how I built the insulated fish storage area. Because I used the whole aft section, there is lots of room back there. It did add on 5lbs or so of weight. However, it was worth it to keep the fish fresh. You can really taste the difference! Let me know if you have any questions.
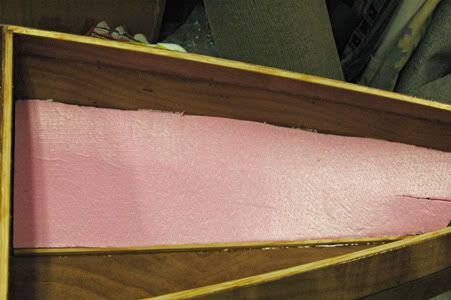
Below are the steps I took. I used pink foam-board insulation with a layer of 1.5mm ply over it to make it water-tight. The seams where fileted and glassed. I did the front & back ends first. Then I worked my way from the bottom left/right sides upwards.
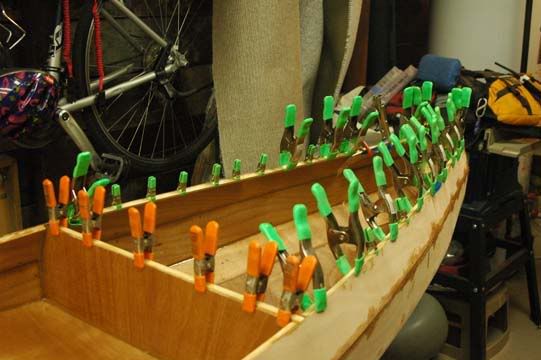
1. Built a water-tight bulkhead behind the rowing station so that the whole aft section is an insulated/watertight fish-holder. It's basically 3mm marine ply filleted into place with no gaps.
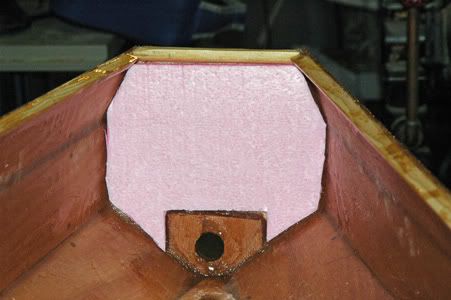
2. Below is the foam-board installed with Liquid Nails to the back of the rear-bulkhead.

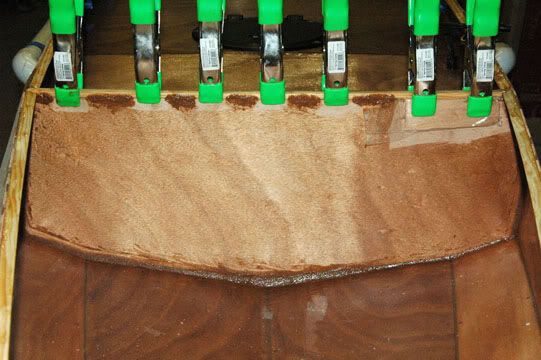
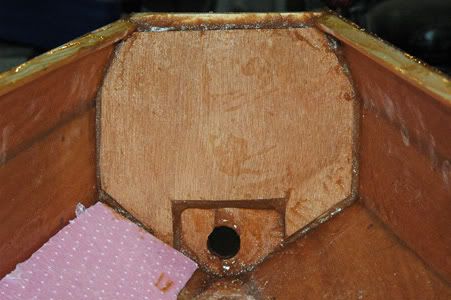
3. Below is the 1.5mm Okume ply filleted to the hull and quarter-round over top of the foam-board. Make sure to fill all gaps so that it's watertight.
4. Stern foam-board installed with Liquid Nails
5. Stern 1.5mm Okume ply filleted to the hull
6. I ripped some pine and glued it onto the hull bottom centerline to provide a glueing/support base for the ply. Then I used liquid nails to put the foam in. I used weights to hold the foam down.
7. I forgot to take more pictures along the way. The finished pictures are below. Basically I used epoxy/wood flour to fillet the bottom panels to the ripped pine at the centerline, to the hull up higher, and to the front/back ends. I used weights on plastic to hold the ply down while the fillet cured. Then centerline seam was glassed. Then I did the next panel up on left/right. Foam in and then ply filleted to the bottom one just installed, the hull higher up, and the ends. The lower side was then glassed at the seam. I repeated this working my way up to the quarter round supports for the deck.
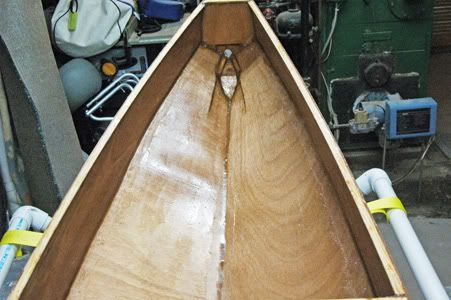
8. When I had finished all the sections with foam/ply I glassed the entire thing to give strength, avoid punctures, and make sure it was watertight.
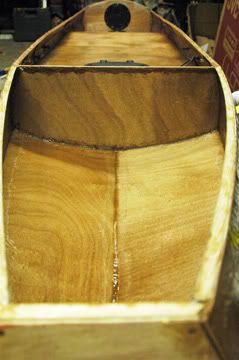
9. While I don't have pictures of it, I mixed epoxy with white pigment and put a few layers on. I don't know if white makes any difference but, I thought it might help with insulation and clean-up of fish gunk.
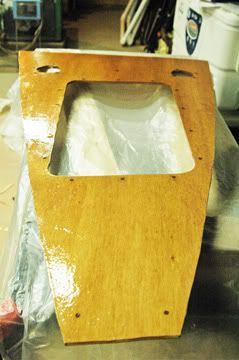
10. Then I worked on the aft deck. Aft-deck saturation coated and glassed.
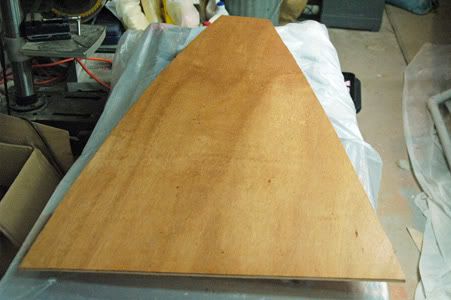
11. Aft-deck holes cut for hatch, rod holders, safety flag, & carrying handle.
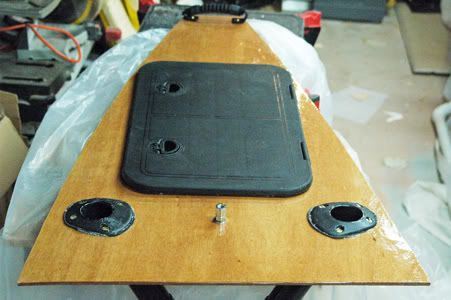
12. All of the above installed in aft-deck.
13. While I don't have a picture, I then put foam on underside with liquid nails. Made sure not to cover screws/nuts. This was tedious.
14. Aft-deck tack-welded, sanded, and glassed to hull.
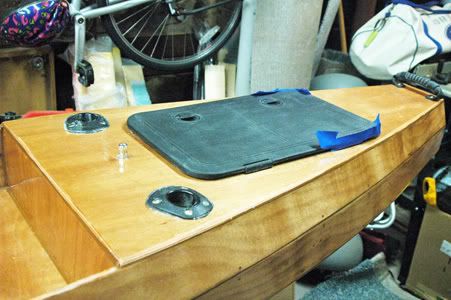
15. Because the black hatch would heat up in the sun, I put 1.5mm ply on the outside of the hatch. I also put foam/ply on the inside of the hatch as well. I guess a white hatch would have been better.
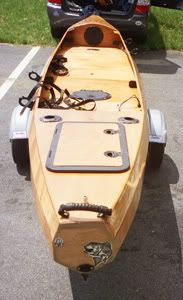
I hope this helps explain how I built the insulated fish storage area. Because I used the whole aft section, there is lots of room back there. It did add on 5lbs or so of weight. However, it was worth it to keep the fish fresh. You can really taste the difference! Let me know if you have any questions.
Below are the steps I took. I used pink foam-board insulation with a layer of 1.5mm ply over it to make it water-tight. The seams where fileted and glassed. I did the front & back ends first. Then I worked my way from the bottom left/right sides upwards.
1. Built a water-tight bulkhead behind the rowing station so that the whole aft section is an insulated/watertight fish-holder. It's basically 3mm marine ply filleted into place with no gaps.
2. Below is the foam-board installed with Liquid Nails to the back of the rear-bulkhead.
3. Below is the 1.5mm Okume ply filleted to the hull and quarter-round over top of the foam-board. Make sure to fill all gaps so that it's watertight.
4. Stern foam-board installed with Liquid Nails
5. Stern 1.5mm Okume ply filleted to the hull
6. I ripped some pine and glued it onto the hull bottom centerline to provide a glueing/support base for the ply. Then I used liquid nails to put the foam in. I used weights to hold the foam down.
7. I forgot to take more pictures along the way. The finished pictures are below. Basically I used epoxy/wood flour to fillet the bottom panels to the ripped pine at the centerline, to the hull up higher, and to the front/back ends. I used weights on plastic to hold the ply down while the fillet cured. Then centerline seam was glassed. Then I did the next panel up on left/right. Foam in and then ply filleted to the bottom one just installed, the hull higher up, and the ends. The lower side was then glassed at the seam. I repeated this working my way up to the quarter round supports for the deck.
8. When I had finished all the sections with foam/ply I glassed the entire thing to give strength, avoid punctures, and make sure it was watertight.
9. While I don't have pictures of it, I mixed epoxy with white pigment and put a few layers on. I don't know if white makes any difference but, I thought it might help with insulation and clean-up of fish gunk.
10. Then I worked on the aft deck. Aft-deck saturation coated and glassed.
11. Aft-deck holes cut for hatch, rod holders, safety flag, & carrying handle.
12. All of the above installed in aft-deck.
13. While I don't have a picture, I then put foam on underside with liquid nails. Made sure not to cover screws/nuts. This was tedious.
14. Aft-deck tack-welded, sanded, and glassed to hull.
15. Because the black hatch would heat up in the sun, I put 1.5mm ply on the outside of the hatch. I also put foam/ply on the inside of the hatch as well. I guess a white hatch would have been better.
Re: Great summer/fall w/ 2 great yaks!
You did a great job on that insulated aft tank well. Great idea and I'll be incorporating it into my build. Thanks for the info and pics, they were a great help.
Phishtech
Phishtech